Monday 18 July 2011

How do you allow/unblock a website that is protected by Sonicwall NSA Firewall content filter

This is one of the first tasks you will be asked to perform once you have put content filtering in place. As this is a straight question I will give a very short and concise answer. See below : sonicwallLogoShadowed4


1. Go to your Sonicwall login page
2. Login using your admin username and password
3. Go to Security Services>Content Filter
4. Under ‘Content Filter type’ choose ‘Configure’
5. Go to ‘Custom List’ tab
6. Under Allowed Domains> Click add
7. Add your URL >Click OK>Click OK
You will now see it in the ‘Allowed Domains’ list.

On the client machine close all browser windows, re-open, and go to the previously blocked website. It should now appear.

Sunday 17 July 2011

Website appears in plain text without images after Sonicwall NSA firewall content filter has been allowed

The company I am doing work for have recently adopted Twitter.com as part of their marketing strategy and as a result the CEO needed access to the site. sonicwallLogoShadowed4
It had previously been blocked by default but it now need to be added to the custom list within the Sonicwall content filter.

This did unblock the site but it was only showing the text of the site and not the text and images.

Can you guess what the problem is yet ?. Twitter.com uses another website to provide the images to it’s site i.e. twimg.com which is also blocked by default. Therefore, in order to resolve this problem you will need to also add ‘twimg.com’ to the filter aswell.

Although, this works for Twitter it is true of all sites that show as plain text. In order to find the site that contains the images just keep refreshing the page and make a note of the URLs that ‘try’ to load in the bottom left of the browser.

Saturday 16 July 2011

Symantec Endpoint protection won’t update client across DMZ

I recently had a situation in my network where I wanted to protect a new server with Symantec Endpoint Protection but the client machine was in a different DMZ (Demilitarized zone).  Symantec-Logo-Photo
For example, the Symantec Endpoint Protection Manager is on my internal LAN and the web server I wanted to protect is in my public DMZ.
I was able to deploy the client software to the web server but it was then unable to contact the management server for policy updates. This was verified by going to :
1.Symantec Icon in the system tray>Right click>Open Symantec Endpoint Protection
2. Help and Support>Troubleshooting>Management Tab
Under general information you will see ‘Server : Offline’ instead of a valid machine name or IP address.
So from this we can see that the client software cannot communicate with the management software.
Solution
Symantec uses ‘TCP 8014’ for this communication and this will need to be opened on your firewall between your Public DMZ and your internal LAN.
Once this rule has been added to your firewall you can go back to step 2 above, click on ‘Update’ under ‘Policy profile’ and you will see that ‘Server :’ will now have a machine name or IP address next to it.
After 5-10 mins your client software will be updated.

Tuesday 12 April 2011

Validate numeric form fields in VBA

To help users enter the correct information every time they use a VBA form we can apply some validation checks. VBA_logo
In today’s example I have a field called ‘productID.text’ that will always be a number. To ensure that no other types of characters are input, you can use the following code.
Private Sub productID_Change()

If IsNumeric(productID.Text) = False Then
MsgBox "The product ID must be a number"
productID.Text = ""
End If

End Sub
The code is applied to the change event of the field and makes sure it only receives numbers. If an illegal character is entered it pops up a message asking for the correct input and then clears the field ready for the next attempt.

Monday 11 April 2011

Perform validation on blank fields in a VBA form

When a user is inputting information it will be necessary to build in some quality checks to prevent the user from entering inaccurate or poorly formatted information. VBA_logo
One type of validation check that should be carried out involves checking to see if any important/mandatory fields have been left blank. The code below will check this and prompt the user if the information has not been provided.
If productID.Text = "" Then MsgBox ("Please enter the product ID")
If productID.Text = "" Then Exit Sub

This code pops up a message to the user to enter the product ID and when they click ‘OK’ the second line ensures the field is blank ready for user input.
This code should be added to your ‘Submit’ button.


Friday 8 April 2011

Open a ‘Save As’ file dialogue box for Word using VBA

It may be necessary to complete an action in Word or Excel and then automatically pop up a ‘Save As’ dialogue . VBA_logo

In my case not only did I need to pop up a Save window but I also needed to give it a pre-determined name. Once the user had entered some details and submitted the information for the VBA code to act on, I didn’t want them to alter the document any further. In addition, I also wanted to standardise the word document and cut down on the work the user had to do.

Here is the code that will produce a Save window with the pre-populated name of ‘MyFileName’.

Dim fNameText As String
fNameText = “MyFileName”
With Dialogs(wdDialogFileSaveAs)
.Name = fNameText
.Show
End With


In the above example I have declared a variable, assigned it some text and then used the variable to populate the filename in the Save As dialogue.


Therefore, when the user saves the document it will be called “MyFileName.doc”.

NB. You could also just add the filename directly without a variable :

With Dialogs(wdDialogFileSaveAs)
.Name = “MyFileName”
.Show
End With

Thursday 7 April 2011

How to add a tab character in VBA

Adding information to a spreadsheet, word document etc is one thing but most of the time you will need to add some formatting. VBA_logo

A tab character may be necessary to improve the appearance of your entry so this will need to be accommodated in your VBA code.

You can add a Tab character in your VBA code by using one of the following :
  1. Chr(9)
  2. vbTab
Here is an example of the code in use :

phoneDets = “Phone number : “ & Chr(9) & Chr(9) & “07896541243”

This code is assigning the string ‘Phone number :’ with two tabs inbetween and then the actual phone number.

So the output will be :

Phone number                                  07896541243.


Wednesday 6 April 2011

Write information into subject line of word document properties using VBA

The document properties within Word can be manipulated using VBA code and here are a few ways that we can write information to them. VBA_logo
To write hard coded text
ActiveDocument.BuiltInDocumentProperties("Subject") = “Hello World”
To write the value of a variable into the subject line
ActiveDocument.BuiltInDocumentProperties("Subject") = VariableName
To clear the subject line of any information
ActiveDocument.BuiltInDocumentProperties("Subject") = “”


Tuesday 5 April 2011

Select and delete all text within a word document using VBA

The project I have been working on requires the user to fill in a VBA form, submit the details and then VBA (macro) code will write the information into the document. VBA_logo

This is quite straight forward but the user could open and submit the form again causing duplicate entries. Therefore, I needed a way of selecting any text that was already present in the document and deleting it BEFORE any new entry was written.

So here are the two small bits of code you will need to select all the text and delete :

Selection.WholeStory
Selection.Delete


If you put this before you write into the document, you will always be guaranteed a blank canvas !.


Monday 4 April 2011

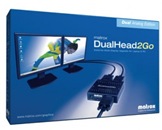
Matrox DualHead2Go extend desktop configuration for dual screens

A new laptop arrived in the office and the user required a dual screen setup.

Matrox DualHead2Go was selected as the appropriate bit of hardware to do the job so all that was left was to set it up.
dualhead

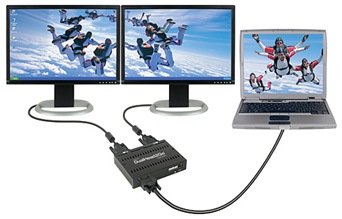
In our office we all have desktops with two monitors. Most of these are implemented by having graphics cards with two video outputs. This allows us to extend the desktop over both screens using just the Windows OS (Operating System).

Programs can be moved between screens and has standard behaviour such as maximising a program within it’s current window.

Matrox DualHead2Go

The first thing to do is connect the two monitors to the Matrox adapter and then connect the USB cable to the laptop/PC. Once the software is installed you are now ready to apply the configuration.

DualHead2Go

When I got to this stage the image on the laptop was duplicating itself on both screens and there was no obvious way to extend the desktop and get the functionality I required.
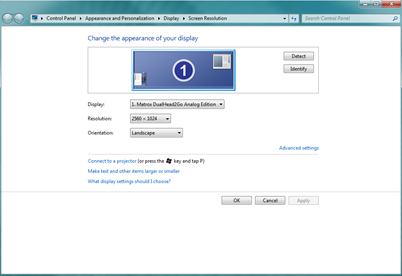
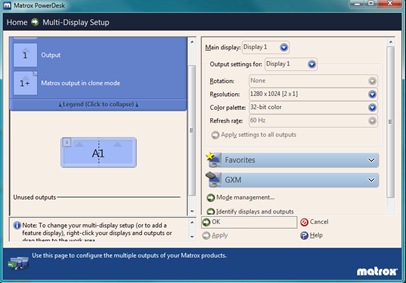
After some trial and error I managed to stumble upon the correct setup. So with the lid of the laptop closed I applied the following.

WINDOWS DISPLAY SETTINGS

monitor setup

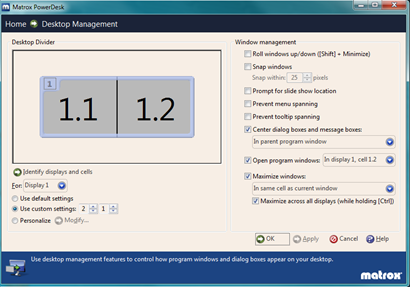
MATROX POWERDESK SETTINGS

matrox1
matrox 2

**Please note *** If you are unable to find some of these options or you change the settings and they are not maintained, I have found this is just a glitch in the hardware/software. To resolve this just pull out the USB lead which powers the Matrox adapter and plug it back in and it will sort itself out.

Friday 1 April 2011

Philips SpeechExec Pro USB Smart Key licensing dongle

The Philips SpeechExec Pro software requires the USB Smart Key (License Dongle) in order to be used.
philips_logo

Without a valid license the software interface will not open and a warning message is produced.

During the installation of the software an option is provided to download the license off the USB Smart Key to the computer. If this is not selected then you can just make sure the dongle is plugged in every time you wish to use the software.

However, if you wish to download the license to the pc so it is always present it can be done in the following way :

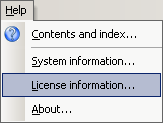
1. From the main window of the software, click Help > License Information.

clip_image002

2. From the License Information Window, click “Download License” to download the license from the USB Smart Key to the computer. This will allow use of the software without inserting the USB License Key.

clip_image002[5]

*  To remove the license from the computer back to the USB Smart Key, insert the USB Smart Key and click “Upload License”. This will allow the software to be transferred to a different computer.

Wednesday 30 March 2011

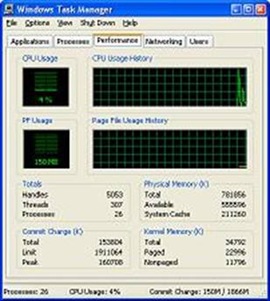
Task manager menu bar and tabs are not visible

You open up ‘Task Manager’ and you notice that File, Options, View, Shut down and all the tabs are missing.

Fear not – This is a ‘feature’ and is a result of task manager running in ‘tiny footprint mode’.
frustrated-computer-user
To restore Task Manager back to it’s default settings i.e. with the menu and tabs do the following :
clip_image001
1. Double click the border of Task Manager i.e. where it is showing as red in the above image.
clip_image002
You will now see Task Manager in it’s full glory !

Tuesday 29 March 2011

Why aren’t my icons showing on my Windows 7 desktop ?

So you have a nice new Windows 7 PC and you save an item to your desktop but it doesn’t show up!.

A colleague of mine had this problem today and below is how I solved it (with an additional method I could have used had the first fix not worked.
windows-7-logo

This has to  be one of the easiest fixes going but only if you know what to look for.

Method 1 – Windows 7 show desktop icons setting

Right click on your desktop > View > Select ‘Show desktop icons’.

show_desktop_icons

Method 2 – Configure local group policy (If the above doesn’t work)
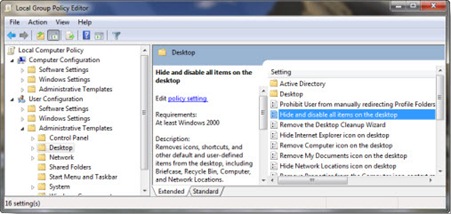
1. Go to start menu type ‘gpedit.msc’ and press ‘Enter’.

2. Navigate to User Configuration > Administrative Templates > Desktop.

local group policy

3. In the settings pane, open Properties of ‘Hide and disable all items on the desktop’.
Configure your choice there. 

4. If Enabled, this setting removes icons, shortcuts, and other default and user-defined items from the desktop, including Recycle Bin, Computer, and Network Locations.
To show desktop icons, ensure that the setting is ‘Not Configured’.

5. Hit Apply > OK.

6. Restart your computer.


Monday 28 March 2011

Microsoft outlook : The form requested to view this message cannot be displayed

Recently one of my users tried to enter an appointment into her calendar only to receive the following message : “The form required to view this message cannot be displayed. Contact your administrator”.
form cache
A reboot or updates won’t solve this error because the forms cache has become corrupted. The following fix worked a treat in Outlook 2003 so hopefully it will work for you too.
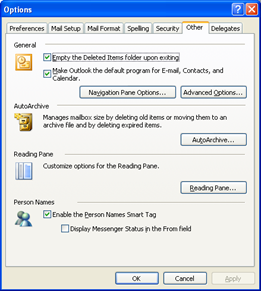
From the ‘Tools’ menu, select ‘Options’ and click on the ‘Other tab’.
OptionsOther
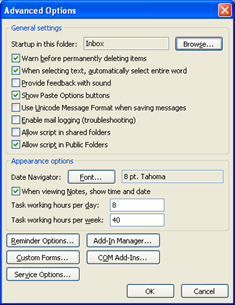
Click on ‘Advanced Options’, which is in the ‘General’ section of the dialog
AdvancedOptions1
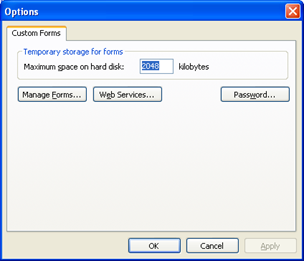
Now click on ‘Custom Forms’
Options
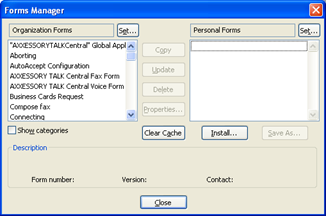
Click on ‘Manage Forms’.
FormsManager
Click on Clear Cache

Friday 25 March 2011

Microsoft FaceID numbers for VBA programming

If you want to use Microsoft’s icons within your VBA (Visual Basic for Applications) code, you will probably have to refer to something called a ‘FaceId’. This FaceID requires a number which tells the office application which image to display. For example in the code you may see ‘.FaceId = 59’. microsoft-office-2007

This FaceID would give you the ‘smiley face’ icon when the code was executed.

So how do you know which number to use for which icon ?.


Thankfully, the answer lies in the following graphics.

1-500 501-1000
icons1-500 icons501-1000
1001-1500 1501-2000
icons1001-1500 icons1501-2000
2001-2500 2501-3000
icons2001-2500 icons2501-3000
3001-3500 3501-4000
icons3001-3500 icons3501-4000
4001-4500 5001-5500
icons4001-4500 icons5001-5500
5501-5685
icons5501-5685

Thursday 24 March 2011

How to find the codecs which are installed on your PC using Windows Media Player

I usually look for codecs which are installed on a PC by going to the system options but I have recently found  a nice way of viewing them through Windows Media Player.

Below are the steps to follow :
audio
1. Open Microsoft’s Windows Media Player.
2. With the application open, press the ALT key on your keyboard to access the drop down menu.
3. Go to “Help” –> “About windows Media Player”.
4. Click on the "Technical Support Information" link in the About Window.
You will now be presented with a web page listing all of your installed codecs!.