Thursday 23 January 2014

3 ways to open and view network connections in Windows XP

There are several ways to access the network connections on a Windows XP machine.

Therefore, as it is a common question I thought I would demonstrate the 3 main ways to view this window.
image

Method 1
Go to your network icon in the System Tray (lower right corner of the screen) clip_image002

Right click on the icon and go to ‘Open Network Connections’.

clip_image004

Method 2

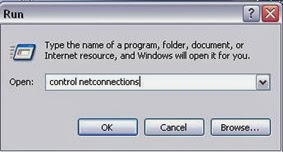
Go to Start button > and select ‘Run’ or press ‘Win key + R to open a run dialogue window.

In the run window field type in ‘Control netconnections’.

clip_image006

Method 3

1. Go to Start > Control Panel > network connections (if in classic view)

or

2.Go to Start > Control Panel > Network and Internet Connections > Network Connections (if in category view)

All of the above methods will take you to the ‘Network Connections’  :

image

Wednesday 22 January 2014

How to create and setup a VPN connection on Microsoft Windows XP

Most companies have the ability for their staff to connect to their network while they are not physically in the office.

Usually this is done via a Virtual Private Network (VPN).
vpn2

To create a VPN connection on Windows XP you will need to do the following :

Open and view your network connections

The first step is to open your network connections and there are several ways of doing this :

Method 1

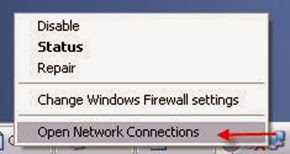
Locate the network icon in the lower right corner of the screen (System Tray) clip_image002

Right click on the icon and go to ‘Open Network Connections’.
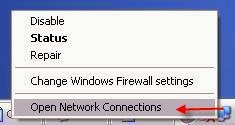
clip_image004

Method 2

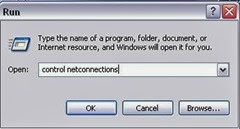
Go to Start > Run or press ‘Win key + R to open a run dialogue window.

In the run window field type in ‘Control netconnections’.
clip_image006

Method 3

1. Go to Start > Control Panel > network connections (if in classic view)

or

2.Go to Start > Control Panel > Network and Internet Connections > Network Connections (if in category view)

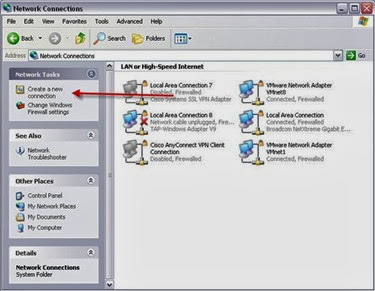
All of the above methods will take you to the following window :
clip_image008

Creating the connection

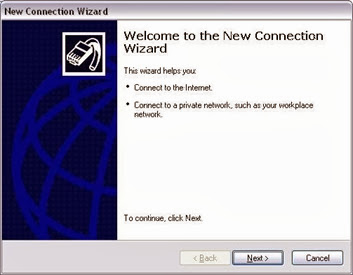
Click on the ‘Create a new connection’ (See above) and the ‘New connection Wizard’ will be displayed.

Complete as shown
clip_image010

Click Next

clip_image012

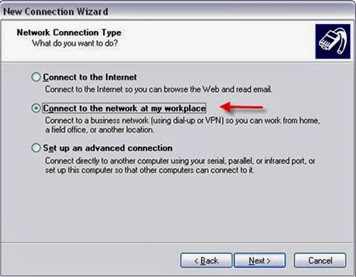
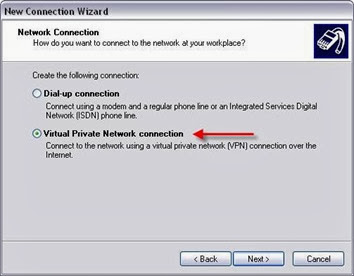
Select ‘Connect to the network at my workplace’.
clip_image014

Select ‘Virtual Private Network connection’ and click Next.
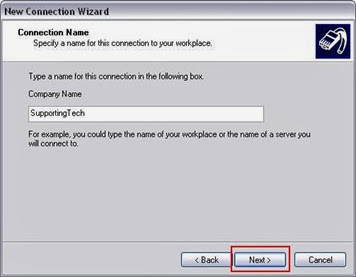
clip_image016

Enter the name for the connection. This doesn’t need to be the server address as this will come on the next page of the wizard.
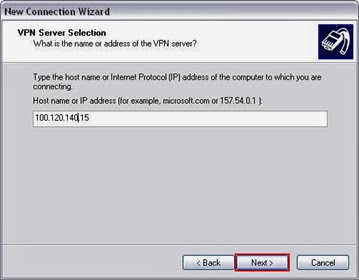
clip_image018

Enter the IP address or server name for your VPN. You will be given this by your network administrator.
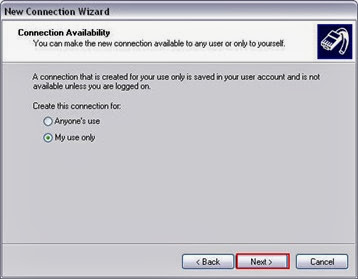
clip_image019

Complete as above unless multiple people use your machine and will also use the VPN.
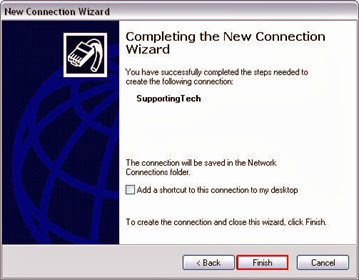
clip_image020

Your VPN connection has now been configured.
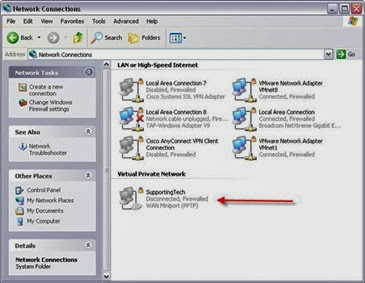
clip_image022

Change the gateway setting

By default this connection will route all of your traffic via your VPN. If you want only the traffic required for the VPN to be transmitted over the VPN and all other traffic/connections to be unaffected, you will need to alter a setting on the adapter.

Open your network connections (See method 1,2 or 3 above).

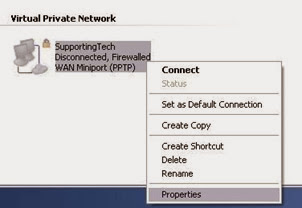
Right click your VPN connection and go to Properties
clip_image024

Go to the networking tab

clip_image026

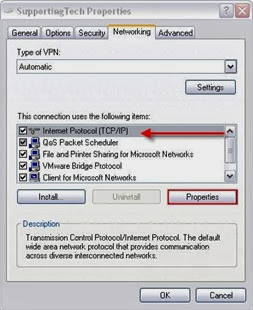
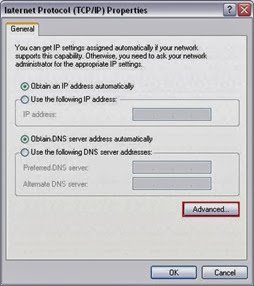
On the networking tab highlight the internet protocol (TCP/IP) and click properties.
clip_image028

Click advanced on the properties window.
clip_image030

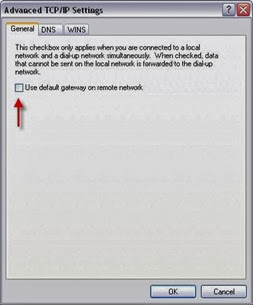
Untick the ‘Use default gateway on remote network’ option on the general tab and click OK.

Connecting the VPN

Open your network connections (See method 1,2 or 3 above).

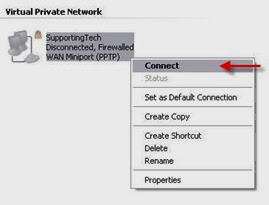
Right click your VPN icon and select ‘Connect’.
clip_image032

This will open a login window.

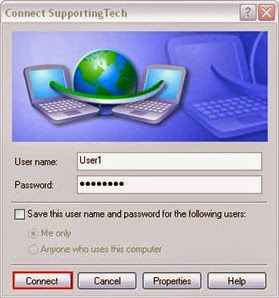
clip_image034

Enter your username and password and click connect. It will verify your username and password.

clip_image036

A new connection will now show in your system tray.

clip_image038

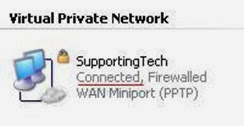
The network connection in your Network connections window will now show as connected.
clip_image040

Your VPN is now active and ready to use.

Friday 17 January 2014

How to upgrade and add larger drives to a Buffalo Terastation

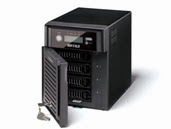
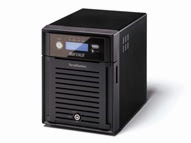
For some time I had wanted to upgrade my Terastation from a 1TB capacity to 3TB. This wasn’t really a pressing issue until one of the drives failed, leaving me with the dilemma of paying for a new 1TB disk or biting the bullet and going for two new 3TB drives. I chose the latter. ts doors

After a couple of hours of googling and reading forums of people trying to decide whether it was possible or not to perform the upgrade I called Terasation to ask them directly to which they responded “We don’t support it, it is best if you just buy a bigger unit” (For hundreds of pounds is the part they left out).

As I couldn’t find a clear step by step guide on how to do the upgrade I decided to jump in, work it out and then create an article for other people to use. So here’s how it’s done.


1. Take screenshots of your existing Terastation setup so you have something to refer back to later.
2. Backup your data to another location – VERY IMPORTANT.
3. Shutdown the Terastation, open the front panel and slide out the old disks.
4. Unscrew the old drives from the hard drive cages.
5. Screw cages to new disks.
6. Slide new drives into the Terasation.
7. Install Nas Navigator from disk onto your PC if you don’t already have it installed. (The disk would have come with the unit when it was purchased).
8. Power on the Terastation and run the Nas Navigator.
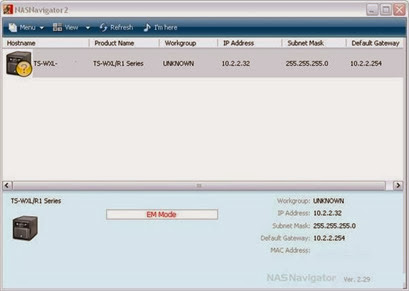
9. Error on first nas navigator screen.
clip_image002
10. When you hover over the icon of your Terastation an error appears saying “The EM mode was detected. Update firmware or contact your local technical support”. You will now need to update your firmware.
11. Go to http://www.buffalo-technology.com/en/support/downloads/
12. Put the model of your Terasation in and download firmware .zip.
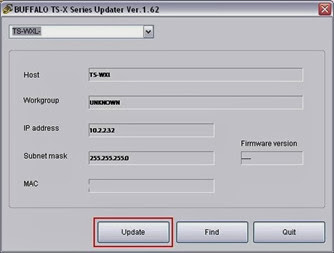
13. Extract zip and Run TSupdater.
clip_image004
  1. Press update.
  2. You may receive this error.
clip_image006
  1. If you do, click ok and then quit the tsupdater screen. Find the TSupdater.ini file and open it in notepad and find the following entries :
[Flags]
VersionCheck = 1
NoFormatting = 1
17. Change the “NoFormatting=1” to “Noformatting=0” and save.
18. Double click the TSupdate.exe and click the update button.
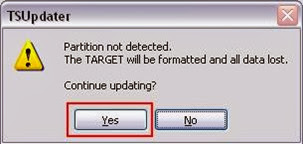
19. This time you will get a different message :
clip_image008
20. Click Yes
  1. It will start formatting and will then transfer and install the firmware.
  2. A message will appear saying the terastation needs to be restarted. Restart it and don’t touch it. When it comes up it will finish installing the latest firmware. It reboots itself and then comes back and shows the latest firmware version on the led.
  3. When the terastation comes back up – access the web interface you may see that it is now in Japanese. Don’t worry – Log into the interface using ”Admin” & “Password” (which are the default login details for a Buffalo Terastation).
24. You wont be able to read the text (unless you’re Japenese or can read the language) so below is a screenshot of where to find it i.e. 4th item along on the main menu > first item next menu, third box down and click button.
clip_image010
  1. Once you select English from the drop down the Terastation will update itself to the correct language.
  2. You’re upgrade is complete you now have a larger capacity Buffalo Terastation.
A word of caution : By default, the Terastation will configure itself as Raid 0 which will not provide any resiliency if a drive fails. Therefore, you should change to RAID 1 which mirrors the disks.
For instructions on how to do this, please see my last post entitled ‘Recreating a disk array – change from RAID 0 to RAID 1’ on Buffalo Terastation.


Recreating a disk array – change from RAID 0 to RAID 1 on Buffalo Terastation

The factory configuration for a Buffalo Terastation is RAID 0 i.e. if the unit contains two disks they will be set up to act as one large disk. This is OK but it does mean that if one of the drive fails all data will be lost. Buffalo-TeraStation-ES

A better configuration is RAID 1 which will make the disks mirror each other i.e. if one drive fails the data is safe because an exact copy still exists on the other drive.

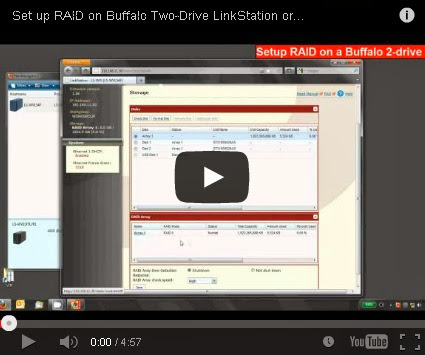
I recently upgraded my Buffalo Terastation from 1TB to 3TB which involved reformatting the drives and restoring back to factory settings i.e. RAID 0. As I wanted to change it to RAID 1 I searched around and stumbled upon this great video that explains how to do it in detail.

I have summarised the video at the end of the post for those that want the text version.


Video notes

1. Log into your Terastation device using the web admin user interface.
2. Go to system option and select the storage tab. This will bring up all your disk and raid information.
3. The first step is to delete the existing RAID array (RAID 0) by going to the Raid  array area of the interface.
4. Click on the option to delete the RAID array. Deleting the RAID array will delete all of the data on the disks.
5. Type in the confirmation number to confirm you want to delete the array and data.
6. It will then delete the RAID array which should take a couple of minutes.
7. By going back to the default folder area you will see there are no shares present anymore.
8. The next step is to create the new RAID array (RAID 1) by going into the system tab > storage. In the RAID array box click ‘Array 1’ and it will scan for all of your disk.
9. Use the drop down menu to toggle which RAID mode you need > Select RAID 1.
10. Select all disks to be included in the array and select ‘Create RAID array’.
11. Click OK and enter the confirmation number.
12. Once the Raid has been created go to the Folder setup and create a folder share.
13. Under storage the RAID array status will show as ‘Checking’ as the Terastation is checking the integrity of the array but you can continue to use the Terastation as normal while this happens. When it is complete the yellow light which may be blinking on the front the Terastation will stop.