Friday 22 November 2013

Citrix logon page in Internet Explorer browser shows blank/black screen

When using a Citrix Access Gateway you will use a web address (URL) to access the logon screen. You will then enter your username and password and begin your Citrix session. citrix-logo1

However, I recently encountered a problem whereby when I went to the web page I received a complete blank/black screen with no logon options.
If you are encountering the same problem you are in luck as I have found two ways of solving the issue.

Method 1 : Compatibility settings

Go to the Gear (or Cog) icon in Internet explorer and select compatibility view settings.

image
You will be presented with the following screen
image

You will see that your current URL will be in ‘Add the website’ field > Click Add
image
You will see that it is now added and will always use compatibility view in the future.
Untick ‘Display intranet sites in Compatibility View’.
Click Close
clip_image002
Your logon screen will now appear.
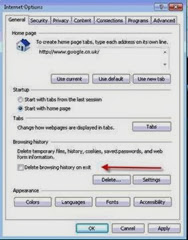
In addition, to these settings make sure that the following setting is un-ticked in your internet options.
clip_image004
If this is ticked it will wipe out your compatibility settings every time you close your browser, resulting in you having to repeat the above steps every time you wish to access the Citrix logon page.
Method 2 : Emulation and Document Mode
  1. Access the Citrix Access Gateway website
  2. Press F12 whilst in your browser
  3. Under Emulation, select the Document mode to be 8, the Browser profile to be Desktop and the User agent string to be Internet Explorer 8.
I hope this was helpful.


Internet information server (IIS) HTTP 503 Error Server unavailable

Within my company we have a windows based client-server application which uses IIS at the backend. error 503

For months (since we virtualised) we have randomly been experiencing a ‘503 server unavailable’ error which has stopped the application completely.

As we didn’t have a great deal of information on the problem and we had many users jumping up and down we resolved the issue temporarily by restarting IIS using the ‘IIS reset /noforce’ command. This would keep the issue at bay for a few days and then it would occur again. One day I had the problem 4 times in one day so I decided to get to the bottom of it.

I found that the problem was not being caused by an error but by a safety mechanism built into IIS application pools called Rapid Fail Protection. Here is an explanation I found as to why the default application pool was being disabled :

“Rapid-fail protection is unique in that it doesn't apply to recycles based on requests and resources. Instead, an application pool is placed into rapid-fail protection if the IIS 6.0 W3SVC fails to ping the worker process, if the worker process crashes, or if its startup or shutdown time limit is exceeded. This is a sign to the service that the worker process is no longer available and for health reasons should be shut down. When a pool is placed into rapid-fail protection, W3SVC actually stops the app pool, and HTTP.sys returns 503 responses to all queued requests and to all new requests to that pool.”

OK so this explains part of the problem :

  1. Several worker processes encounter issues
  2. W3SVC fails to get an adequate response.
  3. W3SVC shuts the application pool down
  4. Users get the ‘503 server unavailable’ error.

This is good as it explains what is happening but why has this started happening since we virtualised.

In our case it was a simple tick box. Before we virtualised we had the application running on a physical server which didn’t have a lot of RAM and we would often get ‘No system memory’ errors and our application would stop working.

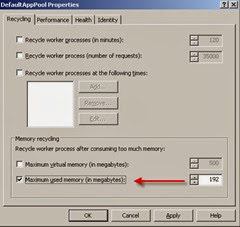
When we virtualised one of our engineers tried to address the issue by limiting each worker process to a specified amount of RAM before it recycled itself.
clip_image001

Note : To access DefaultAppPool Properties – Open IIS on your server > expand Application Pools > Right click DefaultAppPool>Select properties> Recycling tab

As a result the worker processes would often use up their allocated memory and would terminate and not be contactable. In busy periods this would happen to several of the worker processes all at the same time which would cause Rapid Fail Protection to be triggered.

So the solution was to untick the ‘Maximum used memory’ setting and restart IIS. As we had virtualised and increased our memory we could afford to give the application free reign.

Mystery solved.

Thursday 7 November 2013

How to restart IIS without losing data

There may be a time where your webserver IIS (Internet Information Server) encounters a problem and you need to restart it.

kb-iis-reset-6

If data is being written via a website or an application that uses IIS, a forced reboot on IIS may result in data loss.

To combat this there is a nifty command that can be used which will try and stop IIS but will wait until it has finished processing it's current task. In order to run this command do the following :

1. Open up a command prompt (Winkey + R and type cmd)
2. type in "iisreset /noforce"
3. You will see that it tries to stop IIS but fails. This is normal as it will wait for IIS to finish.
4. After 30 secs to a minute, try the command again and you will see that it stops the service and then restarts it without any data loss.

Wednesday 6 November 2013

Windows 8.1 update – How to change the default keyboard language to UK (or any other)

Windows 8 has always been less than user friendly so with the 8.1 update I was expecting Microsoft to have thrown the users a life line.

The ongoing theme of windows 8 seems to be “Where would the user expect this to be…”
Windows-8-Logo-1

“OK let’s move it from there !!”.

So it came as no surprise that shortly after I had installed the Windows 8.1 update (and the keyboard had defaulted to US English) I could not find a simple way to change it. On all other versions of Windows it was solved with a trip to the control panel >Languages >Input options and select from the keyboard options. However, this is how you do it in Windows 8.1.

1. Go to Control Panel.

2. Select Language image

3. Click Options

image

4. Click ‘Add an input method’

image

5. Scroll down to keyboard layout you want to install, click Preview to check how it looks, click Addto add to the input methods.

image

6. Close the language window and Control Panel if it is no longer required and go back to the desktop.

7. In the notification area you will now see a language option appear. Select English (United Kingdom) and UK United Kingdom keyboard option.

image
Now your keyboard should be in the language of your choice.